User Information •Must be installed in a clean, dry environment where it will not be exposed to high temperatures, moisture or excessive dust. •Do not touch the products or any connections with wet hands. •Ensure the power is switched off if the receiver or remove batteries if not in use for a long period of time. •There are no user serviceable parts in the products attempting to repair the product will void the warranty. •Do not install or use the device if the connected cables are damaged. •Warranty is void if the serial number label is removed |
|
|
Full Instruction Manual
|
|
|

Pairing Fobs & Receivers
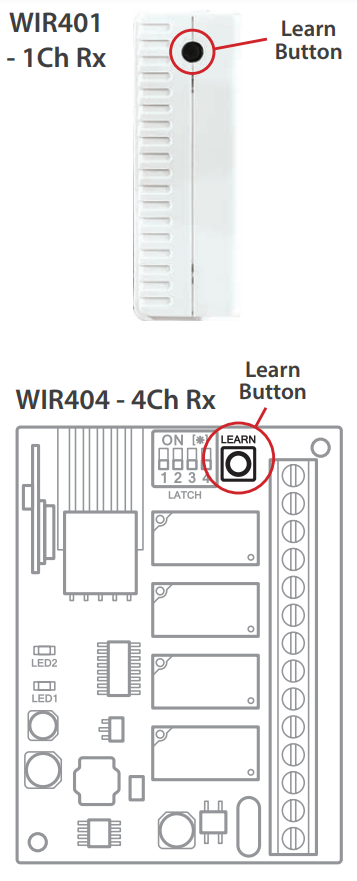
Step 1 Press the Learn button on the receiver. The LED light on the front of the unit will turn red.
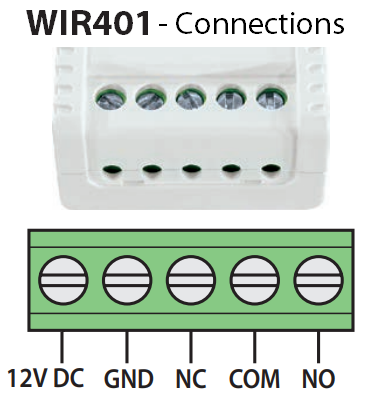
For the 1Ch WIR401 this is found on the side of the unit.
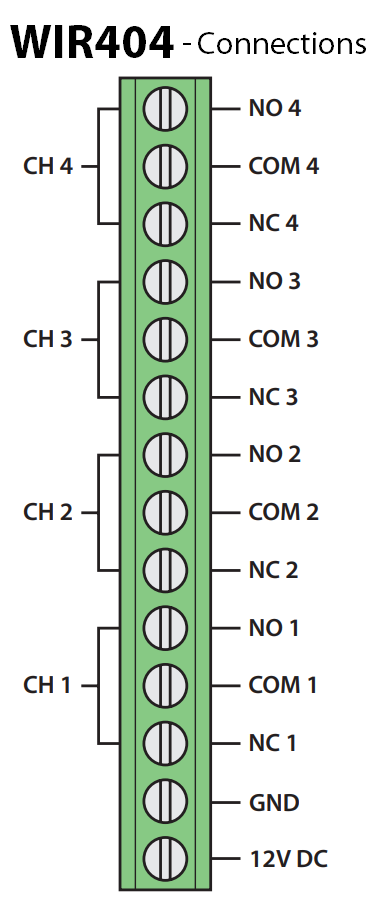
On the 4Ch WIR404 it is positioned at the top of the PCB. Remove the cover by unscrewing the small locking screws on either side of the unit. The front panel can then slide up and off .
Step 2 Press Button 1 on the key fob Twice. The LED light on the receiver will fl ash and then turn off .
Note: When pairing a multi channel key fob all other channels are learnt automatically after learning channel 1. Channel 1 activates relay 1, channel 2 activates relay 2 and so on. |
|
Pairing Key Pads & Receivers
Step 1
Press the Learn button on the receiver. The LED light on the front of the unit will turn red.
For the 1Ch WIR401 this is found on the side of the unit.
On the 4Ch WIR404 it is positioned at the top of the PCB. Remove the cover by unscrewing the small locking screws on either side of the unit. The front panel can then slide up and off .
Step 2
Enter the password for channel 1 (Default 000000 / 6 Zeros) and then press Button A Twice on the key pad. The LED light on the receiver will flash and then turn off .
Note: For changing or resetting passwords see the Password Management section in the full manual.
Operation To trigger channel 1 enter the password and then press Button A. The top left LED will flash when successful.
Likewise, to trigger channel 2 enter the password and then press Button B. The top right LED will flash when successful.
Note: After entering the password, press either Button A or B within 4 seconds. |
Password Change Channel 1 • Hold down Button A until the top left LED lights up.
• Enter the current password e.g. 000000 and press Button A. The second LED will then light up.
• Enter the new password e.g. 123456 and press Button A. The third LED will then light up.
• Re-enter the new password e.g. 123456 and press Button A. The first three LEDs will then flash to confirm the password has been set. |
See the full manual for more information on the Zendit product (use the link overleaf or scan the QR code)
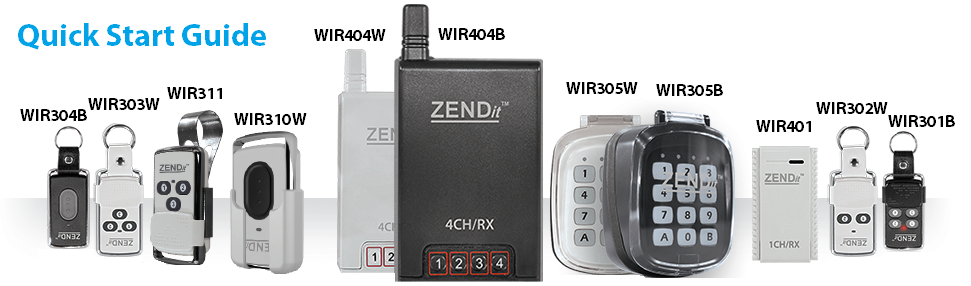
WIR301/302/303/304 |
WIR305 |
WIR401 |
WIR404 |
|
Frequency |
433.92MHz |
|||
Range |
Up to 50m |
Up to 100m |
~ |
~ |
Battery |
3V CR2032 |
3V CR2450 |
~ |
~ |
Voltage & Current |
~ |
~ |
12V DC 30mA |
12V DC 300mA |
Relay Load Capacity |
~ |
~ |
1A 30V DC |
3A 30V DC |
Dimensions |
65 X 37 X 14.5mm |
93 X 73 X 43mm |
58 x 34 x 20mm |
135 x 78 x 30mm |
Max Stored Transmitters |
~ |
~ |
30 |
30 |
Usage |
Internal Use Only |
|||