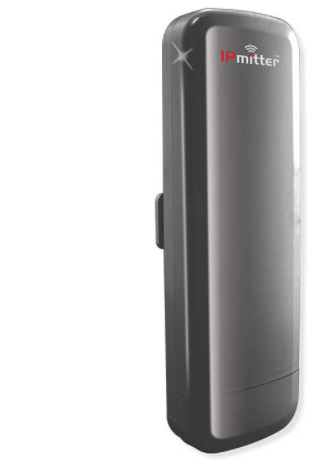
IPMIT430 / IPMIT460 - Quick Start Guide

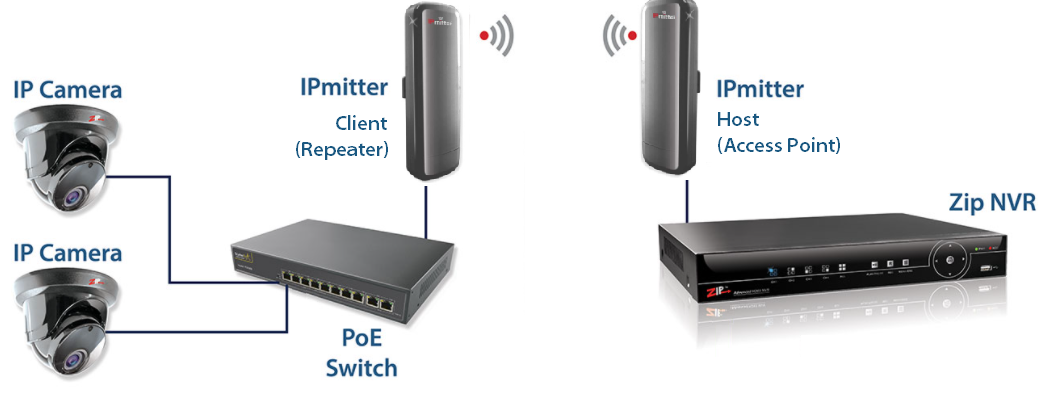
The IPMIT430s can be used to "bridge" an wireless IP connection for IP cameras or other IP devices wireless between two points, devices connect via the RJ45 port on the IPmitter.
Powering
Option 1 - Power from 12V DC (via the 2.1mm DC Socket), the current consumption is 300mA.
The IPMIT430 is polarity sensitive so connections must be made correctly.
Option 2 - Power the camera using 48V PoE, in the RJ45 WAN/POE Socket
The IPMIT430 will take approximately 3 minutes to boot up.
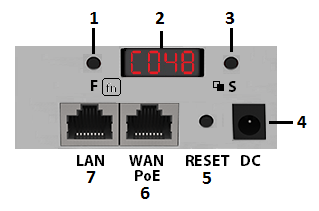
|
1 = Function Button |
2 = LED Display |
|
3 = Setting |
|
4 = 12V DC. 2.1mm DC Socket |
|
5 = Reset/Pair Button |
|
6 = WAN - 10Mbs / 100Mbs / 1000Mbs 48 PoE network socket |
|
7 = LAN - 10Mbs / 100Mbs network socket |
Standard WiFi Bridge Setup
For more setup options see the full manual
Available Channels – 36 - 64 and 100-140 (In multiples of 4)
The IPmitters as default are on H100 (Host and channel 100), and need pairing up before installing. One IPmitter needs to be set to H (Host) and the other to C (Client), they both have to be set to the same channel number.
Example - Pairing on channel 100
1. Power both IPmitters, and leave to boot up for at least 3 mins.
2. Press the F (function) button and "H" will flash. Press the S (setting) button to change to "C100"
3. Press the F button 3 times, then the whole display will flash to indicate the settings have been saved, once it boots back up the display will show "C036".
4. Now press the RST (reset) button for 1 second on both IPmitters. The display will change to a P with a rotating segment whilst pairing and will show P and a value once paired. Pairing can take up to 5 minutes.
NOTE : - Keep both IPmitters at least 2m apart during pairing, if the IPmitters are too close they will "de-sense" and not pair.
- Do not attempt to pair both IPmitters connected to the same PoE switch, they will detect a network loop and not pair.
ERR - On display
1. Default both IPmitters (press and hold rst button for at least 10 seconds).
2. Attempt pairing process again.
The strength will range P-01 (Good) to P-75 (Poor). If P-95 shows then the IPmitters have not paired. Eventually the display will go off.
To add more clients (up to 4) to one host then set the channel on the new client and press the reset buttons on the new client and the Host.
|
www.zipdvr.com/howto/TIP459-How-To-Add-IP-Cameras.html
If using the IPMIT430 with a ZIP Recorder then the cameras needs to be manually configured, scan the QR code to the left for the "how to guide" |

LAN Port 1 Speed |
10Mbs / 100Mbs |
LAN Port 2 Speed |
10Mbs / 100Mbs / 1000Mbs |
Frequency |
5.8Ghz |
Wireless Data Speed |
900Mbps |
Wireless Standard |
IEEE802.11AC/A |
PoE Voltage |
48V |
12V Input Option |
Yes |
Max Tx Distance |
2000m (Recommend 1000m) |
Easy Pair Technology |
Yes |
Support 1 - 1 |
Yes |
Support 1 - Many |
Yes |
Modes |
Access Point / Repeater |
Mounting |
Wall Or Pole (Not Supplied) |
Dimensions |
260 x 88 x 56mm |