1. The VoiceOFF unit can be installed either internally or externally using 4 screw locations, one on each corner of the unit.
2. A free Micro SD card is provided with the unit containing professionally recorded voice messages and sounds. They are as follows:
File Name |
Description / Text |
0001.mp3 |
Warning message - “You have been detected in an unauthorised area, please leave the area or the police will be called, CCTV is recording.” |
0002.mp3 |
Warning message - “This is a restricted area and trespassing is forbidden, you have been caught on CCTV and your images will be saved as evidence against you.” |
0003.mp3 |
Warning message - “Warning! Intruder Detected! CCTV System Recording.” |
0004.mp3 |
Welcome message - “Welcome, this area has time limits on parking. Please observe the restrictions printed on the warning signs to prevent penalties being imposed.” |
0005.mp3 |
Welcome message - “Welcome, please help yourself to the self service coffee and someone will attend to you shortly.” |
0006.mp3 |
Police siren in the distance |
Customer files can be recorded and then loaded onto the Micro SD card for use in the unit but the card must be formatted to the FAT32 file system. It should also be no larger than 32GB in size. Additional voice and sound files for use can also be downloaded from the website: www.voiceoff.com
3. Each MP3 file must be created in a folder called ‘SYSQ’ and the file must be called <nnnn>.mp3 where <nnnn> = 0001 ~ 9999
Note: <description> is not mandatory but useful for identifying recordings.
Note: that file numbers greater than 10 are only triggered using a RS485 or the Network interface.
For example:
the first file could be called 0001.mp3
the fourth for example 0004.mp3
4. The Micro SD card is fitted as shown in the diagram |
|

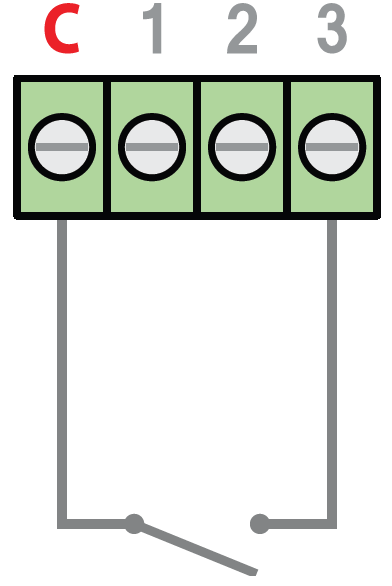
5. Now connect the alarm connections, one of which must be to “C” (GND/Ground) and the relevant alarm connection, which triggers the required alarm recording. For example, you have a dog barking on 0003.dogbarking.mp3 that you require triggering when a PIR detects something, so connect the PIR to GND (“C”) and connector 3. |
|
6. If the alarm input trigger is continuously activated the audio message will repeat. Once the trigger is released it will play the message in its entirety.
7. As an additional benefit there is a 10A miniature relay located on the PCB that has a NO (normally open) or NC (normally closed) and C (common) connections allowing a dry switch to activate whenever any audio is output through the unit. This could be used for example, to trigger a light or another VOX400 trigger port.
8. Power the VOX400 from 12V DC (via the input voltage terminals) on the PCB. The current consumption is 200mA maximum. A power supply is not provided. |
|
