This section describes how to add the IPmitter's address range to a Windows PC which is on a different IP range.
1. Identify the network adaptor the PC is currently using.
Close all programs currently in use.
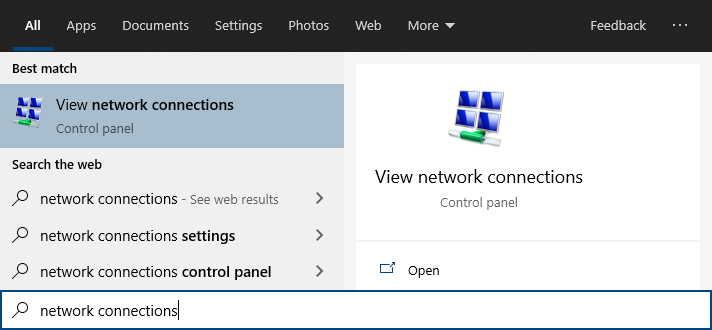
Using the PCs search tool type Network Connections.
•If the hardware connection (Ethernet) is already connected, watch the icon change to indicate "unplugged" by simply unplugging the cable.

If there are multiple cabled adaptors, distinguish between them by connecting/ disconnecting the cable, the status should change.
We can identify the adaptor entry associated with an Ethernet port simply by unplugging and re-plugging the Ethernet cable and watching the icon change. For example:
•Plug back in to determine if that adapter is being used, below shows the adaptor Ethernet being used.

•If using WiFi then ensure all other adapters are unplugged and disabled (right click, then select disable).

Make a note of the current "Connections:" type by name : _______________________
For example Ethernet
2. Find the PC's current IP address.
Using the PCs search tool type CMD then click enter to launch command prompt.
Type in IPCONFIG and click enter.
Look for the adaptor name identified in step 1, for example Ethernet adapter. Scroll up or down if necessary
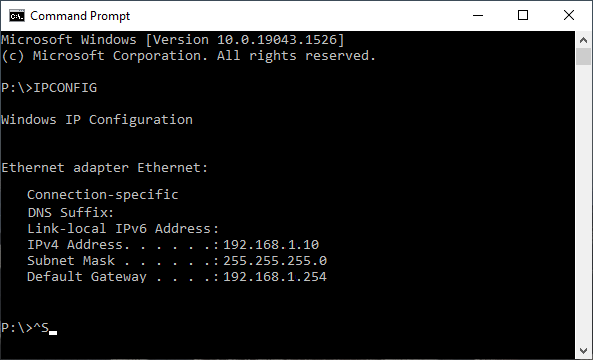
Make a note of this adapters address settings (it will be needed later) :
IPv4 Address: |
______________________________
|
Subnet Mask: |
______________________________
|
Default Gateway: |
______________________________
|
3. Using the PCs search tool, type Network Connections.
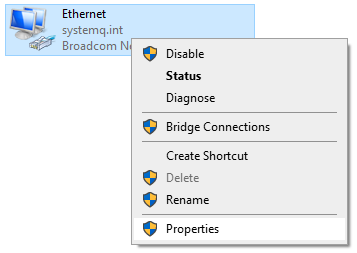
Right-click on the connection type, select Properties.
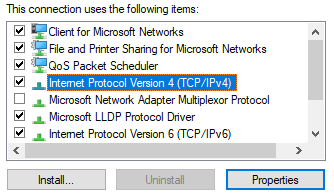
Double click on Internet Protocol Version 4 (TCP/IPv4).
Select Use the following IP address and enter the address noted earlier.
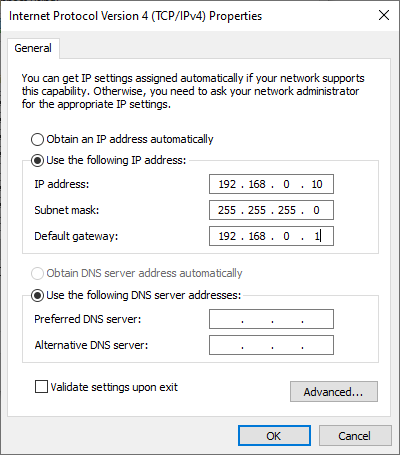
For example: IP address: 192.168.0.10
Subnet mask: 255.255.255.0
Default Gateway: 192.168.0.1
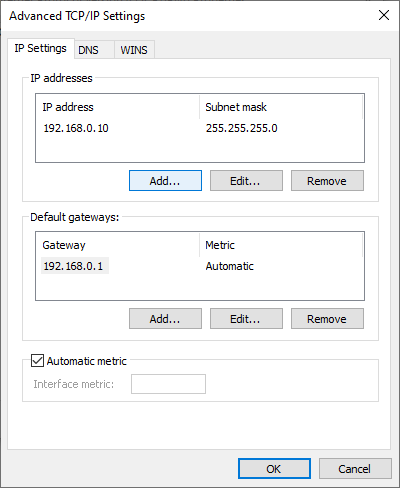
4. Select Advanced and then Add.
Enter the IP address but in the third segment enter a 1.
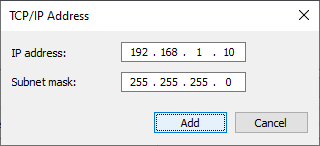
For example: IP address: 192.168.1.10
Subnet mask: 255.255.255.0
Select Add > Ok > Ok > Close
5. Attempt to login to the browser interface on the default IP address (192.168.1.123)
6. Once adjustments in the IPmitter have been completed, ensure the PC is set back to the original network settings.